PowerShell is Logical… Usually

Alternative title: questions I’d ask Jeffrey Snover in an AMA.

I use PowerShell at work on a daily basis. It’s not usually anything complicated, but I couldn’t do my job effectively without it. Office 365 is great, but the GUI is slow, and PowerShell is much faster. Managing Active Directory is easy, but managing objects at any scale is always quicker once scripted, especially when you want to repeat tasks.

Today, I needed to deploy a change to local user accounts on our clients. We have a standard local user account for use at events, so non-staff can temporarily use a laptop without accessing company data.

Our domain policies dictate all accounts must have passwords, and password complexity requirements are applied, even to local accounts. To satisfy this, there’s a standard, unprivileged account, set up on each device that requires it, with a uniform password.

Last year, I rolled out a deployment server, because why deploy hardware manually when you don’t have to? Unfortunately, the new deployment system and the old method of deploying a local account don’t work well together. The password used for the local account conflicts with the configuration settings applied by the deployment server.

This is easy to fix. It requires a change to the password. You can do this individually on computers, but that takes a lot of time and disturbs staff. Therefore, PowerShell is the answer.

There are four PowerShell cmdlets for managing local users:

  • New-LocalUser
  • Get-LocalUser
  • Set-LocalUser
  • Remove-LocalUser

I needed to:

  • Check for the existence of the local user account
  • Create the account if it doesn’t exist
  • Update the account if it does exist

So, I wrote a script that could do this, which I could then distribute. I found it didn’t work consistently, and I had to do a bit of digging into Microsoft’s PowerShell documentation to find the cause. It was simple, but it’s a little illogical.

PowerShell has different types of parameters. Sometimes it’s looking for an integer (a number), sometimes a string (free text, essentially), sometimes a boolean (something that’s true, or something that’s false), sometimes a switch parameter (requires no further input).

There are two differences between the Set-LocalUser cmdlet and the New-LocalUser cmdlet.

First, the New-LocalUser cmdlet has the following parameter:

-UserMayNotChangePassword

Whereas the Set-LocalUser cmdlet has the following parameter:

-UserMayChangePassword

Essentially, these switches do the same thing, but in reverse, and it’s difficult to remember which way round it is. Why can’t they both just use the same syntax?

However, there’s a second issue, affecting both these cmdlets, and another one:

-PasswordNeverExpires

In the New-LocalUser cmdlet, these parameters are switch parameters. You include them and there is no further input.

In the Set-LocalUser cmdlet, these parameters are boolean – you have to set them to $True or $false.

It’s easy enough to fix, but it’s odd logic, eh?
Constraining images with CSS

Small details make a big difference to websites. It’s never a good look when an image is larger than its container. Fortunately, it’s very easy to fix.

Responsive websites are great; mobile-first websites are even better. However, they do sometimes present frustrating issues. One issue which props up on a fairly regular basis is the issue of images – more specifically, a question along the lines of:

Why don’t my images fit on the page?

It’s a simple question really – if text can adapt to fit on a smaller screen, why do images sometimes insist on maintaining their original size? The answer is very simple.

Here’s a fairly average piece of code for an image:

<img src="image.png" alt="Image" width="800" height="200">

When displayed on a website, that image will display at a resolution of 800 pixels wide by 200 pixels high. If you’re using a screen with a lower resolution, the text will be scaled down and the image will dwarf the rest of the content. That’s because, without any other information, the browser doesn’t know any better.

So, to get around it, you need to add the following CSS:

img {
 max-width: 100%;
 height: auto;
 }

This does two things. First, it constrains all images to the maximum screen width. If that is 320 pixels, that’s the size the image will be scaled to. Second, it constrains the image height proportionally, so the image doesn’t look like it’s been squished.

So, what if you need to constrain not just images, but videos, and possibly more besides? Easy. Change your CSS to this:

.constrain {
max-width: 100%;
height: auto;
}

Now, you can use the .constrain class on any element and it will be constrained to the intended width.

Setting a static IP address in Ubuntu Server

Networking takes care of itself in Windows, and static IPs aren’t very hard. But how do you set a static IP address in Ubuntu Server?

I’ve used Linux regularly for more than ten years. For the majority of that time, I’ve used Ubuntu, although I’ve also dabbled in Fedora (without much success) and CentOS (with marginally more).

I’m generally comfortable with Linux and when I’m not, I usually know where to look. However, if there’s one thing I always seem to have issues with on Linux, it’s networking.

When I first used Ubuntu, it was often a struggle to get any usable networking. After a while, it was just wireless (mainly WPA) which caused an issue. Latterly, the main issue I’ve encountered is networking with virtual machines (and most of those issues have been with VirtualBox – VMware doesn’t seem to encounter the same issues).

If you’re working with a server, you’ll want to set a static IP address. Once working, this makes things much easier than using a dynamic address.

If you use Ubuntu Desktop, you can edit these settings very easily from your control panel, but on Ubuntu Server you’ll need to use the command line.

In Ubuntu, your network settings are stored in /etc/network/interfaces. To edit the file, enter nano /etc/network/interfaces in a command line (or, if you have a different text editor, like vi, use that instead of nano). This will open the file in a text editor. A sample file might look like this (comments removed):

auto lo
iface lo inet loopback

auto eth0
iface eth0 inet dhcp

So, what does that mean? Well, there are two interfaces. The first is the loopback interface. Leave that be – if you mess with it, things will break. Ubuntu uses that to communicate with itself.

The second is the eth0 interface. This is your network card. You may have more than one; if you have a second, it might be labelled eth1. Your network card have a completely different designation – on my VMware virtual machine, it’s labelled ens33).

The second line in each of those blocks sets those interfaces. The first lines (auto lo and auto eth0) tell Ubuntu to start those interfaces on boot. If eth0 wasn’t started on boot, the machine wouldn’t have any networking outwith the machine, which will cause you problems!

In the example above, and by default, Ubuntu uses DHCP, so the instance will allow your DHCP server (usually your router) to give the machine an IP address and set any other settings with it.

So, how do you set a static IP address? Well, it goes something like this:

auto eth0
iface eth0 inet static
address 192.168.0.10
netmask 255.255.255.0
network 192.168.1.0
gateway 192.168.1.254
dns-nameservers 8.8.8.8 8.8.4.4

Line-by-line, that configuration does the following:

  • Sets Ubuntu to configure the eth0 interface on boot.
  • Sets the interface as a static interface (rather than DHCP).
  • Gives the interface an address (in this case, 192.168.0.10).
  • Sets a 24-bit subnet mask (so the network runs 192.168.0.1 – 192.168.0.255), and the network in the line underneath.
  • Sets the gateway (router) address. The address displayed is the one used by BT routers – others may use 192.168.0.1.
  • Sets the DNS nameservers to use. I’ve used Google nameservers in this example. You only need one for things to work, but it’s better to have at least two. You can mix them too – for better redundancy, you could use one Google namerserver and one OpenDNS nameserver.

A few quick notes:

  • Once set, you need to reboot the server for the changes to take full effect. Stopping and starting the networking interface won’t cut it.
  • If you forget to add the auto eth0 line and networking doesn’t automatically come up on boot, run sudo ifup eth0 That will manually bring up the inferface. Remember to fix your configuration afterwards!
  • If you don’t set your DNS nameservers, you’ll still have network access, but you won’t be able to resolve domain names. Thus, you will be able to ping an IP address would work, but pinging an FQDN would not work. You’ll eventually notice if this doesn’t work, because things like updates will fail.

This should be everything you need to know to set up a static IP address in Ubuntu.

Changing directories in the Windows command prompt

Everyone knows how to change directories in the command prompt, right? Sometimes you know less than you think.

I’ll admit, this one does seem a little basic. However, it’s something that’s often struck me as odd, yet I’d never bothered to look into further until this week, when my curiosity got the better of me.

In Windows, as in Linux, it’s really easy to change directories when in a command prompt. Say you’re in C:\Users\User, and you want to change to C:\Users\User\Desktop, you would put in the following:

cd Desktop

If you wanted to switch to C:Windows\System32, you would put in the following:

cd C:\Windows\System32

Simple, right? So, if you store files on another drive (as I always do, because it makes backups and sharing much easier for me), and you want to switch to, say, D:\Websites\Website\, you would put in the following:

cd D:\Websites\Website

The trouble is, it doesn’t work. I would always have to do the following:

D:\
cd Websites\Website

Until now, I’d never been bothered enough to look at what i need to do to make it work. It turns out, when switching drive letters as well as directories, you need to use a switch, /D. so, to do it in one line, you need the following:

cd /D D:\Websites\Website

To be honest, I can’t really see any reason why you would need a switch, since nothing happens at all if you don’t use it, but I’m sure someone, somewhere, will know why it’s implemented like that. Although come to think of it, I’ve never really understood why Windows still uses drive letters, as the Linux model of folders relative to root seems much more logical to me!

WordPress updates with SSH2 in Ubuntu 16.04

I’ve had a few issues upgrading WordPress recently. I thought I was going mad, but it turned out to be a really annoying bug.

Recently, I upgraded my virtual private server (VPS) to the latest Ubuntu release (Ubuntu 16.04). I did this for two reasons.

First, it’s good to be on a recent release, and Ubuntu 16.04 is a long term support (LTS) release, meaning it’s supported for longer than other Ubuntu releases, and aimed more at stability for things like servers, rather than all-new features which might be a bit sharp around the edges.

Second, Ubuntu 16.04 came with PHP7 out of the box, which provides drastic performance improvements which, on a VPS, is very useful as CPU resources can be a little constrained.

It also gave me a chance to burn the old install to the ground as over the past three years or so, I’d tested a lot of things out on it and I wanted everything to be nice and uniform, putting into practice some of the things I’d come up with along the way, like my automated website creation script.

Anyway, on my Ubuntu 14.04 install, which used PHP 5.6, I had automatic updates set up on my WordPress installs. They worked nicely and provided good security, as I used SSH2 for the updates, meaning the files and folders the WordPress install lived in were not modifiable by the web server itself.

I host multiple websites on my server, and to enhance security, each site is owned by a different local user, and each database has its own user, so if one site is compromised, it’s harder to compromise the rest.

The web server shouldn’t really have write access to local files, but it needs write access to update WordPress automatically. By using SSH2 for WordPress updates, the web server can get the access it requires without having direct rights. It works well.

The problem is, it’s broken in PHP7. No matter what I did, I could not get updates to work. I came across various error messages, and after a lot of hunting around and double-checking, I was sure it wasn’t because I was doing anything wrong.

And it turns out I was right to be sure. A problem with the php-ssh2 breaks updates for WordPress. If you have this problem, you’re probably not going mad. Fortunately, I can offer a solution: SSH SFTP Updater Support.

This plugin uses a different library and I found that once I’d uploaded the plugin manually and activated it, my updates worked perfectly, first time (because my settings were correct, obviously!)

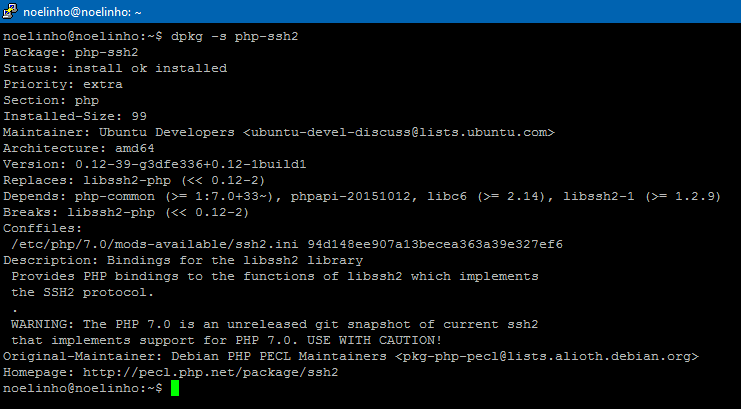
Once I’d fixed this, I decided to see if I could find any more information about this package, so I had a look at the information attached to the package in my installation:

php-ssh2

So this is an unreleased git snapshot and should be used with caution? Doesn’t seem like the kind of package that should appear in a long term support release…

Installing PHP Manager on IIS 10

Have you tried to install PHP Manager on IIS 10? It doesn’t seem to be compatible. But don’t fret – the solution is straightforward.

This is a bit of a niche issue on the whole, but an issue all the same.

Microsoft have a useful utility called the Web Platform Installer, which is a repository of products which plug in to Internet Information Services (IIS) for people hosting sites on Microsoft servers (yes, some people do that, despite what you might read).

One useful utility is PHP Manager. It installs an easily accessible utility into IIS Manager giving you a shortcut to PHP settings. It’s also useful if you run sites on different PHP versions and/or configurations.

One problem. If you try and install it on IIS 10 (Windows 10 / Server 2016), it will fail. Why? It seems to check against a registry entry for the Windows version, and didn’t take into account that the Windows version number might change in the future. Awkward.

The key in question is in:

HKLM\System\CCS\Services\W3SVC\Parameters*

The entry in question is MajorVersion. In Windows 10, it’s set to 10 (decimal). Change it to a lower number (e.g. 8). PHP Manager will then successfully install. Once you’ve installed PHP Manager, don’t forget to change it back!

CCS is shorthand for Current Control Set.

Extracting archive files in Linux

So, you know how to fetch a remote file in Linux, but what do you do if you fetch an archive? How do you extract the files and place them in a directory to work with them?

I previously wrote a how-to guide to fetching a remote file in Linux. That’s great, but once you’ve got the file, sometimes you’ll need to do some more work with it before you can use it.

This is especially true with archive files. Archives generally come in one of two forms:

  1. ZIP files – more commonly used on Windows platforms;
  2. TAR files – more commonly used on Linux and UNIX platforms.

Platforms such as Github and WordPress often offer both ZIP and TAR formats for their downloads.

Once you have the archive file, you need to extract it into a directory. Assuming your file is called wordpress.tar.gz, and you want to extract it to an existing directory called my-site in the same directory, you can use the following command:

tar -xvf wordpress.tar.gz -C my-site/

The -x switch tells tar to extract the files (as you can also use tar to create compressed archives). The -v switch puts tar into verbose mode, so it prints everything it’s doing to the command line, and the -f switch is used in conjunction with the filename to set the file to extract the files from. The -C switch then tells tar to place the extracted files in the directory named at the end of the command.

However, in most cases this will extract the files, but leave the extracted files in a subdirectory. So, in the case of a WordPress archive, the files would be located in my-site/wordpress/ – what if you don’t want the files extracted to a subdirectory?

Not a problem. You can use --strip-components=1 at the end of the command:

tar -xvf wordpress.tar.gz -C my-site/ --strip-components=1

This strips out the top-level directory and leaves the files directly in the my-site folder.

Printing to a file with PowerShell

I need to print a large number of files to PDF. I don’t have time to open each file individually and do it manually, so I needed to find a way to automate the process. PowerShell provided me a solution, with a little ingenuity.

I’ve been trying to tackle a very tricky issue recently. I have a folder of PDF files sitting in a folder, and on a regular basis, the files in that folder need to be password protected and then moved elsewhere.

Acrobat Pro has a great feature called Actions, where you can set a workflow for documents. Normally, I would pick the folder containing these files and use a saved workflow to encrypt each file with a pre-determined password.

Unfortunately, the contents of some of these files (fillable forms) prevent that workflow from applying properly, meaning some files can’t be password protected in this manner. Since they need to be encrypted, it was important to find another way to do this.

I discovered that if I used a PDF printer to print the file to PDF again, the resulting file could be encrypted without issue. This was a good start, but not of much use if I needed to open each file and print the file manually. I needed something that could be automated. Specifically, I needed to be able to:

  • Automatically select the correct printer;
  • Specify a folder and work through each PDF in that folder;
  • Print each PDF to a file without any interaction during the process (so the output path must also be automatic);
  • Avoid interfering with the default print device beyond this task.

So, I turned to PowerShell and Adobe’s PDF printer (which comes with Adobe Acrobat’s licensed products).

Adobe’s PDF printer is useful because it’s possible to specify a default output directory in the printer preferences, and thus avoid a pop-up appearing for each PDF prompting for a save location. Free PDF printers like CutePDF don’t have this option (although I believe they are available in their paid-for products).

After that, everything can be done in PowerShell. Here’s the code I wrote:

$defaultprinter = Get-WmiObject -Query "SELECT * FROM win32_Printer WHERE default=$true"
$PDFprinter = Get-WmiObject -Query "Select * From Win32_Printer Where Name = 'Adobe PDF'"
$PDFprinter.SetDefaultPrinter()
Dir C:\test\*.pdf | Foreach-Object { Start-Process -FilePath $_.FullName -Verb Print }
$defaultprinter.SetDefaultPrinter()

The first line retrieves the current default printer. This is so that, at the end of the task, the default printer is restored (it will be changed for the duration of this task).

The second line retrieves the Adobe PDF printer. On my computer, it’s called “Adobe PDF”. If the named printer doesn’t exist, the script will return a horrible looking error and fail (I’ve no real need for error handling in this script).

The third line of this script sets the Adobe PDF printer from the second line as the default printer.

The fourth line of the script takes a specified directory and, for each PDF in that directory, prints the document. As the default printer is the Adobe PDF printer, that’s the printer that is used. In the Adobe PDF printer, I’ve already set a couple of options:

  • Disabled the option to show the PDF as it’s created (I want the task to run in the background as far as possible);
  • Specified an output directory where the PDFs will be saved to;
  • Set the PDF quality settings (in this case, “Standard”, for compatibility).

The final line restores the default printer, as it’s not likely I would want the Adobe PDF printer set as the default printer.

For me, that’s not the end of the process as I then need to go back in to Acrobat and encrypt the files, but the PowerShell script makes this a much quicker process than it would otherwise be.

I’d love to be able to encrypt the files from the same script, but unfortunately I’ve not found a way to do that. Nevertheless, a time-consuming problem made easier.

Automating Linux website creation

I create a lot of test websites. Sometimes it’s for testing new things, other times it’s for testing upgrades. I’ve always found it’s a hassle to set a new website up, so I’ve tried to automate it.

Back in the days of shared hosting, setting up a new website was easy. It was as simple as:

  1. Set your nameservers to those of your web host;
  2. Log in to their system (usually cPanel) and click something like “New domain” or “New subdomain”.

Since I moved to using a VPS, it’s not as easy as that any more. Firstly, I use CloudFlare, so I use their namservers. Secondly, I don’t run cPanel, or Plesk, which is similar. There are two reasons I don’t use them:

  1. They make hosting more expensive, as they require licences;
  2. They further increase cost as they require much more powerful servers to run.

Currently I can run my VPS for about $5 per month. If I used cPanel or Plesk, they would cost about $50 per month. So, if I can do without, it’s a big saving.

Setting up a new website

There are a few things required in setting up a new website (I won’t cover setting up a VPS – that’s another series I’m working on):

  1. You need a user to own the files;
  2. You need to create the required directory structure and set permissions on it;
  3. You need to create a MySQL user and password;
  4. You need to create a MySQL database and control permissions to it;
  5. You need to set up the web server to make the address reachable.

I’ll assume the DNS is set elsewhere, or using a hosts file. I use Nginx as my web server.

That’s quite a few things to set up, and it would be easy to miss something or get a step wrong. Even if you get it right, it will take a few minutes. The longest part is usually setting up the web server – especially with Nginx that configuration is set centrally and isn’t easily overridden outside of that.

One day I got bored of doing it all manually, so I wrote a Bash script to take care of it. It’s not perfect, but it does a decent job. I decided I’d make it available via GitHub.

Currently, I make a folder it /opt/ and call it something like website-creator. I can run it as follows:

sudo bash /opt/website-creator/create-website.sh

When run, it does the following:

  • Prompts for the fully qualified domain name (FQDN) which will be used to access the website when it’s live;
  • Checks a folder for that FQDN doesn’t already exist (in a pre-determined folder);
  • Prompts for the Linux user who should own the folder for that website;
  • Checks to see if the user exists, and creates the user if it doesn’t;
  • Prompts for MySQL admin credentials;
  • Once authenticated, prompts for a database name;
  • Creates the database;
  • Checks for a MySQL user with the same name as the Linux user which should own the files, and creates a user with that username if it does not exist;
  • Gives that user access to the database which has been created;
  • Creates the folder structure (I use public, private, logs and backups);
  • Copies index.html and 404.html files to the web root for that site;
  • If necessary, creates a file with the MySQL password for the newly-created user and places it in the private directory, with read-access to the owner only;
  • Changes the owner of the website folder structure to the Linux user previously specified (including the file with the MySQL password);
  • Copies a template Nginx configuration to the sites-available directory;
  • Runs a search and replace on that file to insert the domain name and root directory;
  • Activates the site (placing a symbolic link in sites-enabled);
  • Reloads the Nginx configuration;
  • If necessary, prints to the screen the password of the new Linux user.

It’s not perfect, but it does mean I can set up a working website in five seconds, rather than five minutes. There are, of course, some things that may need to be changed once it’s done, like modifications to the site’s Nginx configuration, but without changing anything, it will happily serve static and PHP content.

There’s also a file where runtime variables can be stored. At the moment, it has two:

  • WEBROOTFOLDER – this is the folder the website directories will be created in (I use /usr/share/nginx/);
  • NGINXCONFIG – this is where the Nginx configuration is stored (in Ubuntu, that’s /etc/nginx/, but it may be different on other systems).

It makes my life a lot easier. Maybe it will help a few other people too.

How to screw up your Ubuntu server

Ever wondered how people learn how to solve things? Well, sometimes you just have to break it first. Pro tip: just make sure you don’t break it on something important. Lucky for you – and me – I remembered that bit.

I know, I know, this isn’t really what you’re meant to do. The idea of a guide is to do something useful, to solve a problem, to help people do something quicker, or better… but sometimes, it doesn’t work like that. Sometimes, things happen that give you problems.

Well, I managed that today, so I thought I’d share it. It was – strictly speaking – a work thing, but on a test server that had nothing on it, and already had a slight problem, and I had a feeling it might not go to plan, but I thought I’d try it anyway.

We have a Ubuntu virtual machine which is used for occasional testing for two websites we look after internally, and it turned out the virtual machine’s network connection stopped working because of an issue on the host. Thus, the server was suddenly not a whole lot of use.

The easiest thing to do, given there was next-to-nothing on the server, would beat to boot from the Ubuntu 16.04 ISO (the server was there to test PHP 7 on 16.04) and start again. It would take no more than 20 minutes to get the server back to where it was. However, the alternative was to remove the virtual network card from the virtual machine and assign it a new one. Well, with nothing to lose, it was worth trying, out of curiosity to see what would happen…

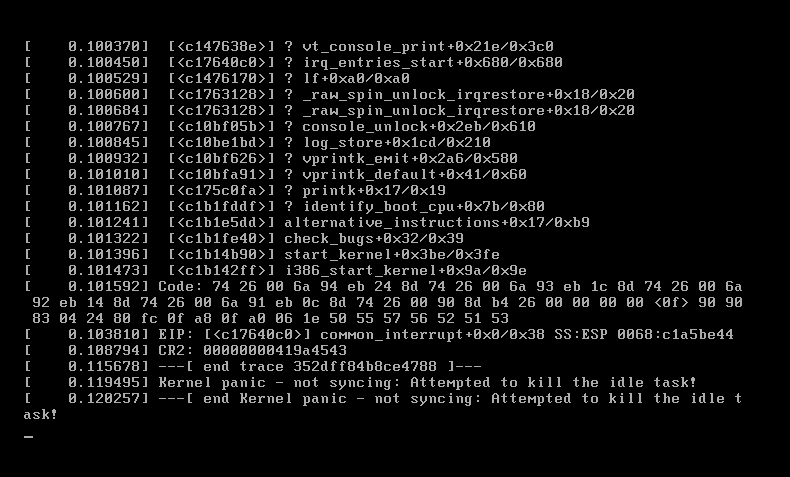
Ubuntu kernel panic

It turns out, it caused a kernel panic and wouldn’t finish booting. It would definitely be quicker to reinstall, but that’s essentially what would happen if it was a real box, the NIC failed and you had to install a new one.

I’m currently debating how curious I am, and if it’s worth seeing how easy it is to resolve an issue like that. I guess it would be nice to know I’d be able to fix it, but I’m currently tempted to take the lazy route.